June 5, 2020

Freiya’s Health & Fitness Journey

FREIYA REEF
I spent my early 20s struggling with chronic back pain, which limited many aspects of my life. Most days it was manageable but even on the good days I would have to be cautious about how I chose to spend my time. The low seats in the cinema aggravated my back so I couldn’t go to the movies; I could drive but if I sat in the car for too long I’d struggle to get out and walk afterwards; I could walk long distances but once my back tired out I’d struggle to move again after I had stopped. Even sleeping was difficult- on a bad night I’d have to wake up and move my bedding every time I needed to change positions, because it was too painful to move underneath my quilt. I often struggled to lie flat so sometimes had to sleep with pillows under my knees to stop the pain getting too intense. I went to many different physios, osteopaths, doctors, etc. but nothing really seemed to work. I did back care yoga where I was half the age of the rest of the group but still had to have some of the movements modified because I just couldn’t manage them. I remember crying during that first yoga class and having to go for a walk afterwards before I could fold myself back into the car. I had to get a friend to take the bus into town once to drive my car home from a physio appointment because I didn’t think I would be strong enough to put the clutch in. My friends got used to me bailing on activities because I didn’t think I’d be up to it, or taking myself off to do some stretching in a quiet corner if I’d managed to make it out. I really struggled to talk about it too, it was embarrassing and uncomfortable, and since nothing seemed to make any difference I had given up on going to specialists. Fortunately, one of my housemates got sick of me limping around the house and made me book in to see a physio who specialised in pain. Dave Moen of Form Physiotherapy helped me to learn about pain and the relationship that it had with my body. I learnt about what my body was capable of and how to move past my mental barriers and challenge myself physically. After a while I was ready to face the world and joined Freedom Fitness. In the beginning I stuck to a program that Pete put together for me after consulting with Dave. This was a really fun way for me to start exploring more of what my body could do and I got a real kick out of it, but soon I was ready for more and that’s where Stephanie took over! Initially I started off with Steph writing programs for me and keeping an eye on me to make sure that I was doing things properly and not skipping reps (which I would never do- don’t listen to her!) Once I was feeling more confident with that I progressed to PT sessions with Steph who could push me harder than I could possibly push myself, and absolutely demolishing those old ideas that I had about my body and what it was capable of doing. Stephanie enabled me to access a strength in my body that I had no idea existed. Now I work with Zina and that has come with a whole bunch of new challenges as I incorporate more cardio (and coordination!) and don’t get to stop until I’m so puffed I can’t even talk- no mean feat! When Dave the physio first encouraged me to join a gym I was really reluctant. I couldn’t see the appeal of working out in public and I had an image of gyms in my head that was not at all positive. But Dave recommended Freedom Fitness anyway, saying that it was a friendly place and not filled with intimidating people in lycra! I’m so glad he did! Freedom has been a place where I’ve been able to make friends, enjoy myself and learn more about the strength of my body than I ever thought possible! I moved house a little while ago and briefly changed gyms to one that was more convenient, but nothing felt the same and I soon decided that the relaxed friendliness of Freedom was worth the extra time in the car each day. If you had told me three years ago that I’d be working out multiple times a week, that I did boot camp and saw a PT regularly, I’d probably have laughed in your face and then felt really sad, because I’d come pretty close to accepting that the pain was going to be an ongoing part of my life but I certainly wasn’t happy about it! Fortunately, I’ve had an opportunity to carve out a different path and learn new and exciting ways to push my boundaries and strengthen myself both mentally and physically. The people here at Freedom Fitness have been a huge part of that, encouraging and supporting me all the way. What a bunch of legends!
It’s been an amazing journey for me, and I look forward to continuing on to the next challenge- which, knowing Zina, will probably have an animal name and require much more coordination than I am generally capable of… But I’m nailing the inchworms now, so she can bring it on!
June 26, 2025
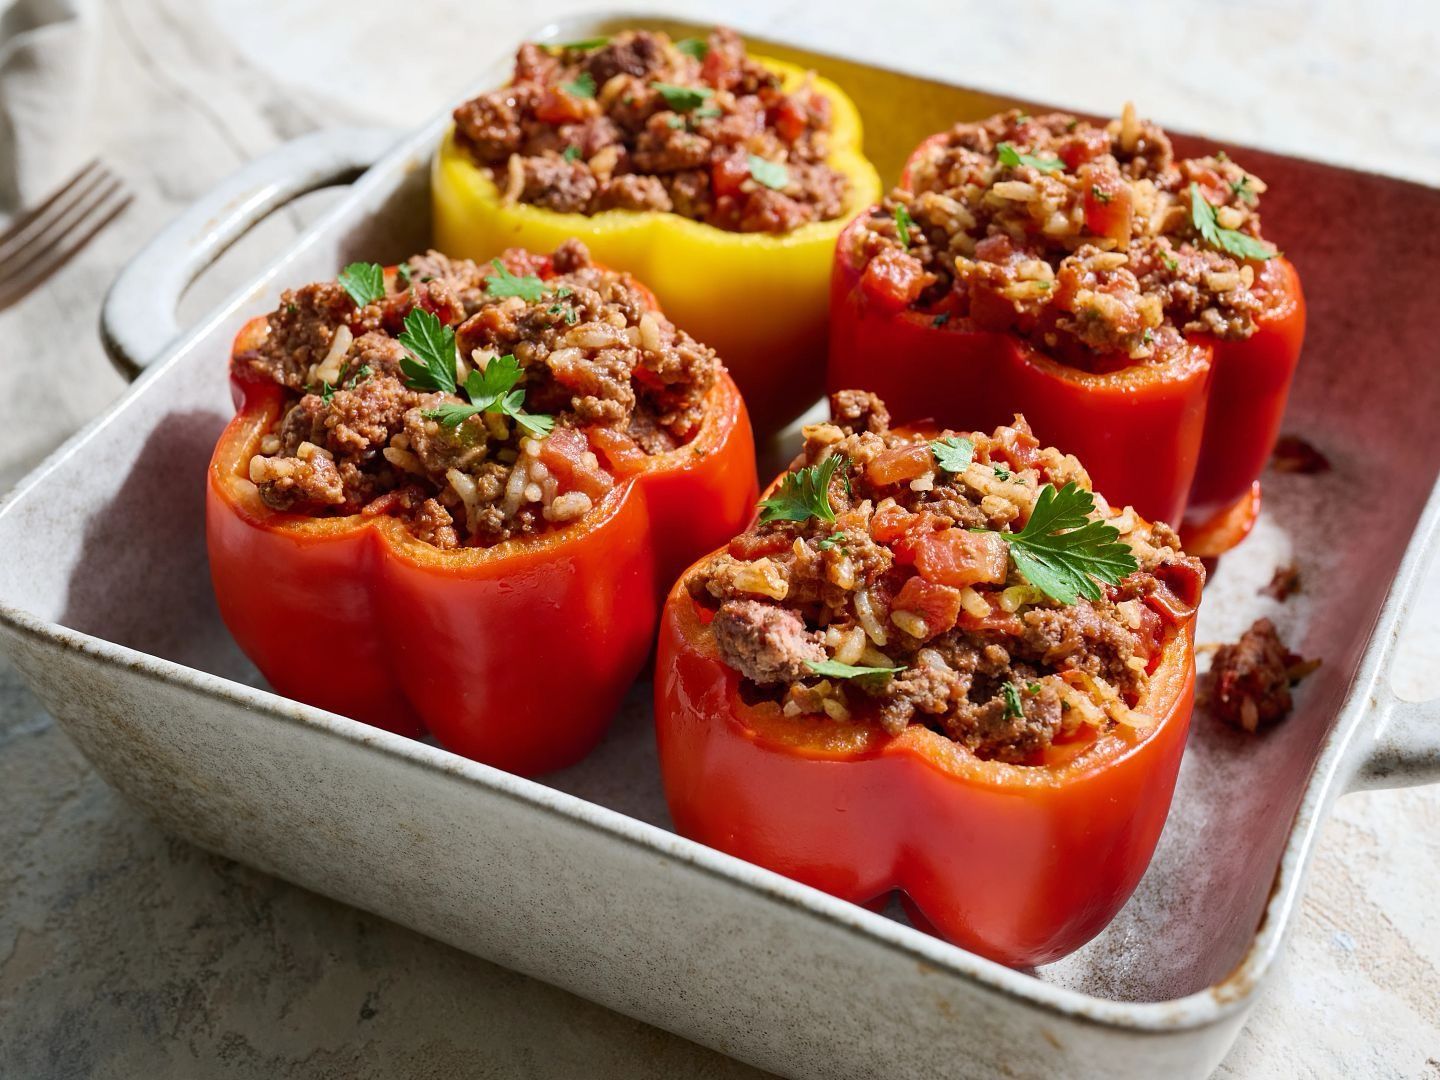
 Classic Beef-Stuffed Peppers 4 servings | 45 minutes INGREDIENTS: 1 pound Ground Beef (93% lean or leaner) 4 medium red, yellow or green bell peppers 1/2 cup minced onion 2 teaspoons minced garlic 1 can (14-1/2 ounces) diced tomatoes with green peppers and onions, drained 1/2 cup cooked white or brown rice 3 tablespoons tomato paste 2 teaspoons dried parsley 1/2 teaspoon salt 1/4 teaspoon black pepper Chopped fresh parsley (optional) METHOD: Coat a large baking dish with cooking spray; set aside. Preheat oven to 475°F. Cut tops off bell peppers; set tops aside. Using a paring knife, carefully remove the membranes and seeds from bell peppers. Arrange peppers about 2 inches apart in prepared baking dish. Place tops on empty peppers. Cover baking dish tightly with aluminum foil; bake 15 minutes. Remove from oven; cool slightly. Meanwhile, heat large nonstick skillet over medium heat until hot. Add Ground Beef, onion and garlic; cook 3 to 4 minutes, breaking beef into 1/2 inch crumbles and stirring occasionally. Stir in tomatoes, rice, tomato paste, dried parsley, salt and black pepper; cook 3 to 4 minutes until heated through, stirring occasionally. Remove pepper tops. Divide beef mixture evenly among peppers; replace tops. Bake in 475°F oven 17 to 22 minutes until instant-read thermometer inserted into center of beef mixture registers 160°F and bell peppers are tender. Garnish with parsley, if desired. Cook's Tip: Cooking times are for fresh or thoroughly thawed ground beef. Ground beef should be cooked to an internal temperature of 160°F. Color is not a reliable indicator of ground beef doneness. NUTRITION (per serving) Calories: 296 Fat: 3,4g Protein: 29g Carbohydrate: 25g Iron: 4,5g
June 18, 2025
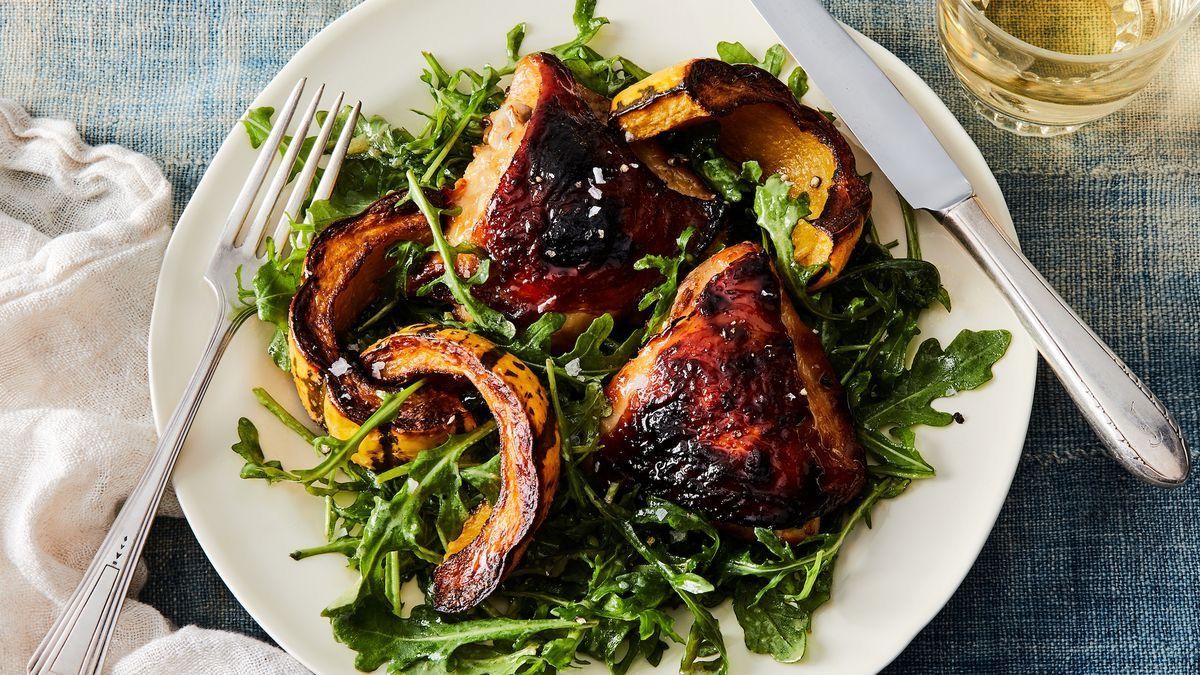
One Pan Miso Honey Chicken Thighs with Squash 2 servings | 40 minutes  INGREDIENTS 1 tbsp Miso Paste 1 tsp Raw Honey 1 Garlic (clove, large, minced) 3 tbsps Chicken Broth, Low Sodium Sea Salt & Black Pepper 1 lb Chicken Thighs with Skin (bone-in) 1 Delicata Squash (large, sliced, seeds removed) 1 tbsp Parsley (minced)  METHOD Preheat the oven to 400oF (205oC). Heat a cast-iron pan over medium-high heat. Mix the miso paste, honey, garlic, chicken broth, salt, and pepper together. Add the chicken and squash to the marinade and toss well to coat. Sear the chicken thighs in the cast iron pan, skin-side down, until just browned, about two minutes. Remove the chicken from the pan. Add the squash and remaining marinade to the pan and place the chicken thighs on top. Bake in the oven for 30 minutes or until the chicken is cooked through and the squash is tender. Garnish with parsley and enjoy!  NOTES Leftovers: Refrigerate in an airtight container for up to three days. Serving Size: One serving is approximately two chicken thighs and one cup of squash. Additional Toppings: Sesame seeds, hot sauce, and/or chopped green onions.  Nutrition Facts ​  ​ Amount per serving ​  623 calories  57gs protein  15gs carb  35gs fat
June 12, 2025
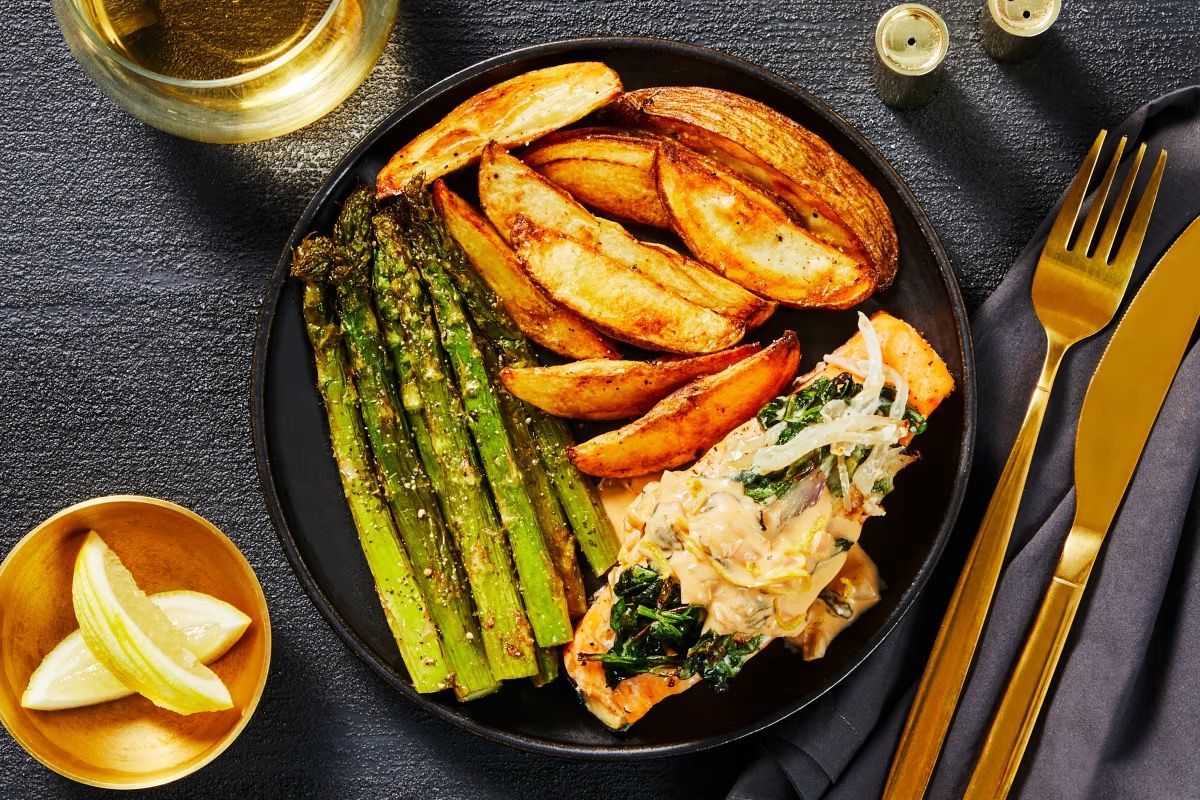
Creamy Spinach Stuffed Salmon & Potatoes 2 servings | 35 minutes  INGREDIENTS 5 oz Potatoes (wedges) 1 tsp Extra Virgin Olive Oil Sea Salt & Black Pepper (to taste) 2 tbsps Cream Cheese, Regular 2 tbsps Frozen Spinach (thawed, drained) 2 Garlic (clove, minced) 1/2 Lemon (juiced, zested) 12 ozs Salmon Fillet  METHOD Preheat the oven to 400°F (205°C) and line a baking sheet with parchment paper. Place the potatoes on the baking sheet and toss with oil, salt, and pepper. Transfer to the oven and bake for 20 minutes. Meanwhile, in a bowl, mix together the cream cheese, spinach, garlic, lemon juice, lemon zest, salt, and pepper. Using a sharp knife, slice down the middle of each piece of salmon, lengthwise. Make sure that your knife doesn't go all the way through. Stuff each fillet with the spinach mixture and season the fillets with salt and pepper. Place the salmon onto the same baking sheet as the potatoes. Place back in the oven and cook for 12 to 15 minutes or until cooked through. Divide the salmon and potatoes between serving plates and enjoy!  NOTES Leftovers: Refrigerate in an airtight container for up to three days. Serving Size: One serving is equal to one stuffed salmon and one cup potatoes. More Flavor: Add parsley to the spinach mixture. Dairy-Free: Use cashew cream cheese instead.  Nutrition Facts ​  ​ Amount per serving ​  563 calories  40gs protein  43gs carb  26gs fat
More Posts